Before you start on this recipe, I would highly suggest you read through the introduction to sourdough. On the service there may seem like a lot of steps that you “could just skip over” but the truth is, bread making is a science and there is a reason for all the little things like, allowing your dough to rest on the bench for 10 mins before you shape the loaf. Also, we explain what the different stages mean.
A lot of people get discouraged during the first loaf so for this recipe, we tried to keep things relatively simple and explain all the steps. Just remember that the bread will taste all the better if you put in the time and work. Also, fair warning, after you make this you will definitely feel like bakers are drastically underpaid for their work.
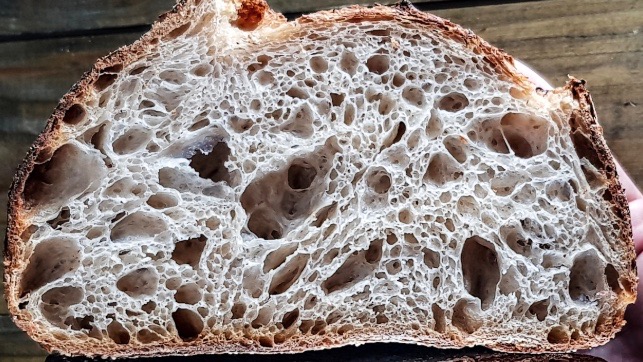
Beginner Sourdough Bread
Equipment
- Kitchen Scale (optional but highly recommended) – $23
- Bread Banneton (optional but recommended) – $29
- Glass mixing bowl – $24
- Bench Knife – $10
- Dutch oven / combo cooker – $43 (Required)
Ingredients
- 900g White Flour Look for flour with a high protein content
- 100g Whole Wheat
- 750g Filtered water (75%) Room temp.
- 200g Levain (20%) 1:2:2 (starter: flour: water)
- 20g Salt (2%) Do not use iodised salt – suggest fine sea salt
Instructions
Levain (Start at 9am)
- Let ferment for 4-5 hours
Autolyse (Start at 9am)
- Combine 900g of white flour + 100g of whole wheat flour with the 700g of filtered water (reserve 50g for when you add the Levain)
- Mix until all the flour is incorporated with the water, 2-3mins of stirring
- Cover with a clean damp kitchen towel or plastic wrap while Levain becomes active (be sure to cover as this prevents the mixture from developing a skin on the outer layer)
Main Dough (1pm)
- Add Levain to the reserved 50g of water
- Now combine the Levain/Water mixture to the Autolysed dough and really get in there and mix this baby by hand until the dough is homogeneous 5-10 mins
- Let rest for 20 mins
- Add salt and knead in the bowl for another 2-3 mins
- Cover and let rest for 1 hour at room temp (ideally somewhere between 75-80°)
Bulk Fermentation | Stretch and Folds (2:30pm)
- Perform the first stretch and fold – in which, you grab a corner of your dough and pull up as much as you can before the dough breaks and fold it over back over the top. Turn the bowl and repeat the stretching and folding for the other three corners
- Cover and let rest for 30 mins
- Repeat another series of stretch and folds then cover and let rest for 45 mins
- Repeat a third round of stretch and folds and again cover and rest for 45 mins or until the dough gets about 30-40% larger
Pre-Shaping (4:30pm)
- Gently release the dough out of the bowl and onto a very minimally floured work surface
- Using a bench scraper, cut the dough into two equally
- form the dough into a loose ball (boule) by using the bench scraper like a snowplow, sliding the dough
- Cover with the bowl and let rest for 10mins
Shaping (4:40pm)
- The idea here is that we want to create some tension on the outside of the dough that keeps the boule in it's shape during the final fermentation. So lightly flour the top of your dough and use a bench scraper to flip the dough over so the floured side is now on the work surface
- Now grab a corner and gently stretch it over the top of the dough, turn and repeat until a tighter ball is formed
- using the bench scraper, move the dough around the work surface. As you move the dough tension should be being create on the outside of the dough
- once the dough is taught, transfer to a WELL floured banneton bowl (this is where the dough will proof until you are ready to bake.
Final Fermentation (overnight)
- cover your boule and place in the fridge over night. The cool temp inside your fridge will slow down the fermentation time and allow some amazing flavors to develop while not allowing the bread to be over proofed.
Bake (the next day 9am)
- Preheat your oven to 500° for at least 30mins (ideally 1 hour) WITH your Dutch Oven or Combo-cooker inside with the lid on.
- Carefully take the dutch oven out of the oven and flip your dough out into the scorching hot Dutch Oven
- At this point you could score the loaf with a razor blade or just allow for the natural brakes in top of the bread to open up (I prefer the latter)
- Reduce the heat in your oven to 450°
- Place the lid on and bake for 24 mins
- Remove lid and bake another 20 mins or until the loaf is dark brown (most amateurs take their loaf out to early and don't allow for the deep flavors to develop in the crust)
- Tip the loaf out and allow it to cool down (for a pro tip, lean the loaf up so the weight of the loaf doesn't deflate the height you just created)